Fawzan's OS212 Page
Fawzan’s useful tips for Operating System Class
Note that this page assumes that you are using Linux (Ubuntu, Arch, or any distro really) as your main OS. Some of the tips here may be able to help you regardless if you are on Windows or MacOS (in fact, some of the screenshots are taken in Windows for convenience).
If you want to request some tips or find any mistakes in this page, please contact me through Discord (Dekano#6884) or LINE if you happen to know my id.
Table of Content (click on them or use ctrl+f to search them):
General tips:
Technical help:
- Cannot generate Github page locally
- Change your username and hostname in your Debian VM
- Add new disk to your Debian VM
- NEVER use EFI for your Debian VM
General tips
How to enjoy Operating System class
I find this class to be the most enjoyable class after Introduction to Digital System. However, I’ve seen someone who calls this class as a sadistic demon or more evil than Lord Dominator. Here’s how I become good at this class (and Linux in general) to the point I helped the assistants answering your questions on Discord.
One skill you need to develop, which is pretty much requirement for every single class in the CS major, is to learn how to google your problem. I thought this is a skill that everyone takes for granted but I guess spending a lot of times tinkering my jailbroken iPad taught me this skill nine years ago unknowingly. If you get an error or don’t know how to do something, try to search the error code or “how to do X” in google.
For example, I had problem getting my new laptop, Lenovo Yoga Slim 7, to hibernate properly when running under Linux. So, I searched “Lenovo Yoga Slim 7 hibernate Linux” and I found this github thread containing the solution for my problem (frankly, I had to use the older, LTS kernel in order for the provided method to work). If you can’t find the solution anywhere on the internet or if it’s very specific to this class like assignments, don’t be afraid to ask on a forum or your friendly assistants.
Also, if you want to learn how to use a command, run man command or curl cheat.sh/command. It gives you useful information on its usage.
The best way to be good at Linux is, well, to switch to Linux as your main OS and learn how to live with it. No, i’m not saying you should install Gentoo right away. However, you should install a Linux distro in your VirtualBox, play around with it, and, after you are ready, install it to your existing computer.
My go-to distro for beginners is Pop OS (non-LTS version) for the following reasons:
- It is extremely beginner friendly and looks super nice out-of-the-box. The installer should not intimidate you
- The user interface (GNOME) is easier to learn than Windows
- Has more up-to-date driver support such as nvidia driver
- Has Ubuntu as its base so any problem people solve in Ubuntu should work in Pop OS
- It doesn’t come with the evil program known as “snap package manager”. You don’t need to know what it is other than it is evil
See this video on how to install Pop OS or this video on dual booting Windows 10 with Pop OS. It’s very easy and you’ll definitely enjoy it more than Windows or MacOS.
The best way to learn vim
Do you want to use vim? That’s wonderful to hear. Here’s a simple way to learn its unique keybinding:
- Run
vimtutor. That’s it
vimtutor is a program, a part of vim itself, that teaches you the basic usage of vim. Play around with vimtutor in the afternoon, use vim consistently, and you’ll get used to vim’s blessed keybindings in just under a week.
Some additional tips for learning vim:
- Get used to hjkl directional control. It is more efficient than using the arrow keys for the following reasons:
- hjkl keys are in the main row of your keyboard while the arrow keys are usually on the edge or corner
- They are closer to your most used keybindings
- Some arrow keys designs are flarf-narblin’ silly. I bet they are designed to hurt your fingers
![]()
Seriously, who designed this arrow keys?
- If you have an Android phone, you can learn vim on the go. Install termux (F-droid version is recommended over the google play version) and install vim there. Just connect a physical keyboard to your phone (a cheap Logitech keyboard with an OTG cable should do the trick)
- Some outside sources you can use for your vim journey:
- DistroTube (Part One, Part Two)
- Luke Smith (vimtutor, Useful Tips)
- vi Complete Key Binding List by Havard University
Technical help
Cannot generate Github page locally
If you get “no implicit conversion of Hash into Integer” error when generating your github page locally (full log), it means you have ruby version 3.0.0. Jekyll, as the writing of this tip, doesn’t support such version. You should install the version 2.7.3.
Steps to fix it in Linux using rbenv:
- Install
rbenvandruby-build(I’m using Arch so I follow what this page says) - Run
rbenv initand do what it says - Run
rbenv install 2.7.3, wait for it to install, runrbenv global 2.7.3to change your ruby version globally - Set the environment variables for
GEM_HOMEandGEM_PATHas the output ofruby -e 'puts Gem.user_dir'(apostrophe included) or just don’t set them/leave them empty (I’m not really sure about the latter) - Reload your shell or terminal and run
ruby -v. You should run the version 2.7.3. - Reinstall all the tools required for github page again
gem install github-pages jekyll jekyll-sitemap jekyll-seo-tagNow go back to your repo and run
bundle exec jekyll serveagain.
Change your username and hostname in your Debian VM
If you are too lazy to install the Debian VM yourself, you ought to import the provided OVA file. In this case, you should rename the username and the hostname (NOT the name of the guest) to your Github username. Here are the steps:
- Run your imported Debian VM and login as root
- Edit (nano or vim)
/etc/hostnameand change the hostname to your github username - There are multiple ways to rename the current username (Substitute
yournamewith your Github username)- Change the username directly by running the following commands [Source]
usermod -l yourname cbkadal # Rename the original username to your name groupmod -n yourname cbkadal # Rename its group of the same name to your name usermod -d /home/yourname -m yourname # Move its homedir to /home/yourname- Create a new account and forget about the original one (or delete it)
 useradd -m yourname                         # Add a new user of your name along with its homedir
 passwd yourname                             # Give the new user a password
 cp -r /home/cbkadal/* /home/yourname        # Copy all content inside the old account into new one
 chown -R yourname:yourname /home/yourname   # Take ownership for the new user
 usermod --shell /bin/bash yourname          # Change the shell of the new user to bash

 # The following commands are optional
 groups cbkadal                  # See all groups the old account is in
 usermod -aG groupname yourname  # Add your new account to the group the old one is in
                                 # NOTE: You have to do it for every group one by one
                                 # Only add to any group you want. No need for all
 userdel -r cbkadal              # Delete the original account
Add new disk to your VM
Sometimes, you may forgot to add the second drive for your LFS partition as it is one of the requirement for your Debian VM. Don’t worry, you don’t need to waste another time reinstalling Debian. Use that time for playing Genshin Impact instead (or Banjo-Kazooie if you are me). Here’s how:
(This should be relevant for week 03 where you need to create the third disk. Just change “sdb” to “sdc”, /mnt/lfs to /yourgithubname, and mkfs.ext4 to mkfs.ext2)
- Open your VirtualBox GUI, select your Debian guess, and open “Settings”
- Select “Storage”, click on “Controller: SATA”, click on the hard drive icon with plus sign, click Create, and follow “Create Virtual Hard Disk”
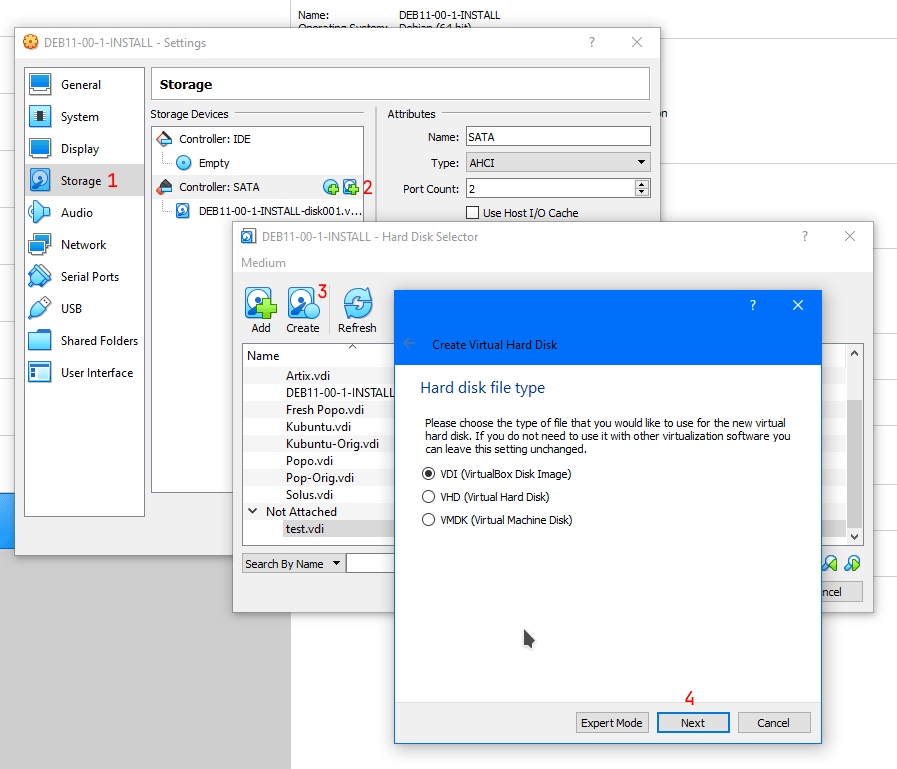
Step 2
- Choose the name and the size you want for your disk. You should always set the storage type to “Dynamically allocated” so the drive won’t use all the space you set after creation. IMO, 64 GB for a Linux VM is a tad superfluous. I usually set my Linux VM to use 30 GB of storage. Set the size “according to your own belief and faith”
- Choose the created drive in the “not attached” group
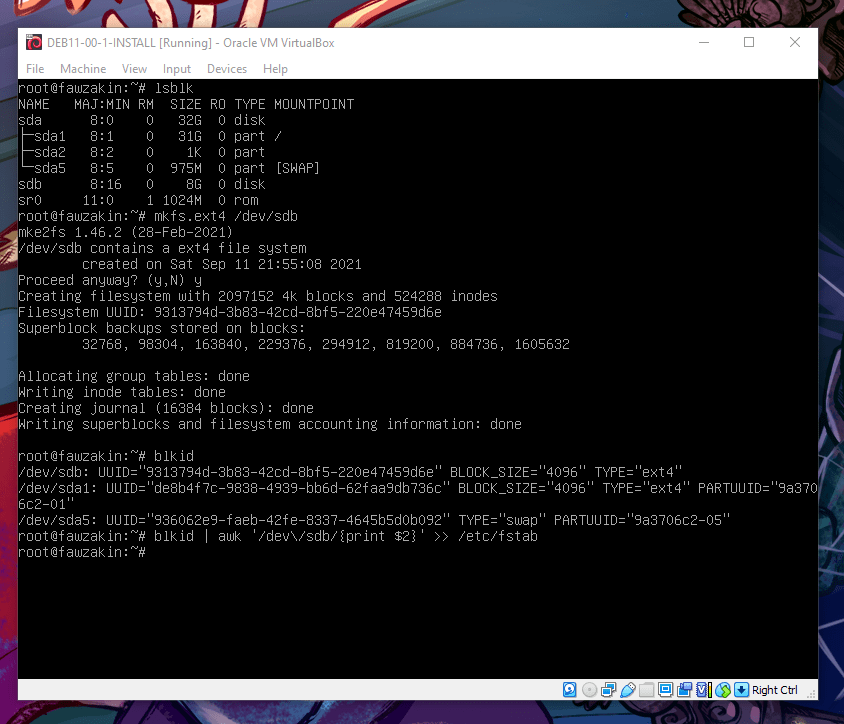
- Run your Debian VM and login as root
- Create
/mnt/lfsdirectory (even if you already created it just in case) with the following:mkdir -p /mnt/lfs - We need to know the name of the drive. Run
lsblkto see its name (usually, its either “sdb” or “vdb”. We’ll use “sdb” in this tutorial. If it shows “vdb” or anything else, replace every “sdb” in any given commands accordingly) - Format the drive with the following. Type “y” and enter if the program asks
mkfs.ext4 /dev/sdb - Now we need to know its UUID. Run
blkidto see it. (pro-tip: run the following command to save some time later)blkid | awk '/dev\/sdb/{print $2}' >> /etc/fstab
Step 7 through 9
- We need to edit
/etc/fstabso that the added drive can be mounted on startup. Just nano or vim into it and follow everything you see in the last line of the following image. Save your edit and reboot. You should have the added drive mounted on startup
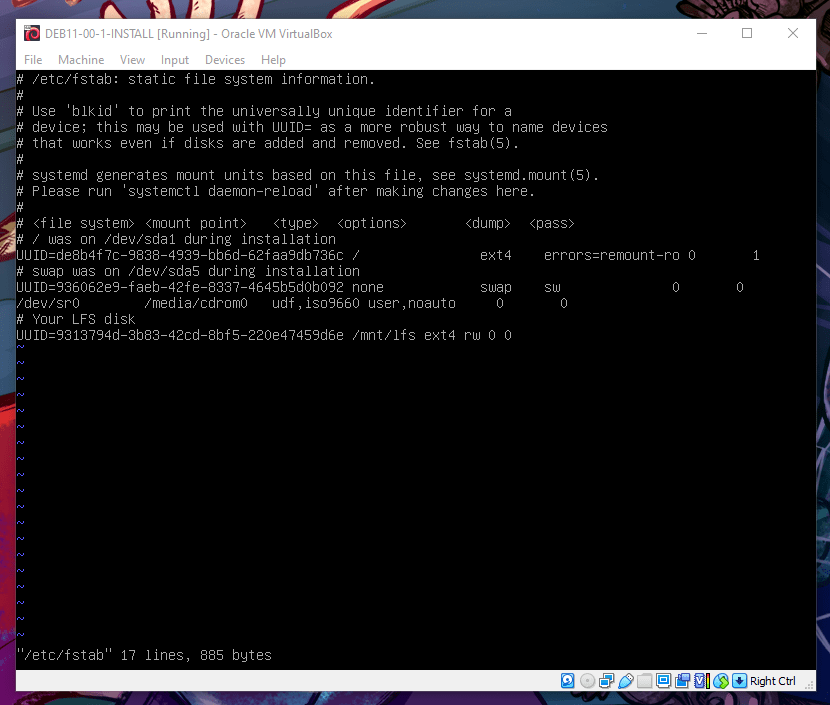
If you run the previous command, you should have the target UUID at the last line. Just edit it from there.
NEVER use EFI for your debian VM
If you export your debian VM with EFI enabled and import it as separate guest, it may NOT BOOT even if you change the disk or use an ISO. I honestly have no idea why this happens but this askubuntu page may give some clue.
If you like using EFI, QEMU + Virt-Manager is a better option although this OS class mandates you to use VirtualBox. So, don’t enable EFI in VirtualBox for your time and sanity.
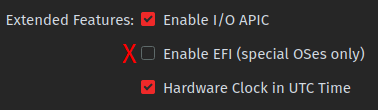
Don't tick the "Enable EFI" option!